Pass NCM-MCI-6.10 Rate - NCM-MCI-6.10 Latest Dumps
Wiki Article
DOWNLOAD the newest DumpsKing NCM-MCI-6.10 copyright from Cloud Storage for free: https://drive.google.com/open?id=19jMG7VU2VGEuieg15RfjKfvSB-apUhwo
The second format DumpsKing also has a product support team available every time to help you out in any terms. And they will fix all of your problems on time. provides its users to study for Prepare for your Nutanix Certified Master - Multicloud Infrastructure (NCM-MCI) (NCM-MCI-6.10) copyright is web-based practice copyright. This format has all the features of desktop practice copyright software for Nutanix NCM-MCI-6.10 copyright preparation.
DumpsKing provides a high-quality Nutanix Certified Master - Multicloud Infrastructure (NCM-MCI) NCM-MCI-6.10 practice copyright. The best feature of the Nutanix NCM-MCI-6.10 copyright dumps is that they are available in PDF and a web-based test format. They both distinguish Nutanix from competing products. Visit Nutanix and purchase your Nutanix NCM-MCI-6.10 and Supply copyright product to start studying for the NCM-MCI-6.10 copyright.
Nutanix NCM-MCI-6.10 Latest Dumps | Latest NCM-MCI-6.10 copyright Vce
We have confidence and ability to make you get large returns but just need input small investment. our NCM-MCI-6.10 study materials provide a platform which help you gain knowledge in order to let you outstanding in the labor market and get satisfying job that you like. The content of our NCM-MCI-6.10question torrent is easy to master and simplify the important information. It conveys more important information for NCM-MCI-6.10 copyright with less answers and questions, thus the learning is easy and efficient. We believe our latest NCM-MCI-6.10 copyright torrent will be the best choice for you.
Nutanix Certified Master - Multicloud Infrastructure (NCM-MCI) Sample Questions (Q12-Q17):
NEW QUESTION # 12
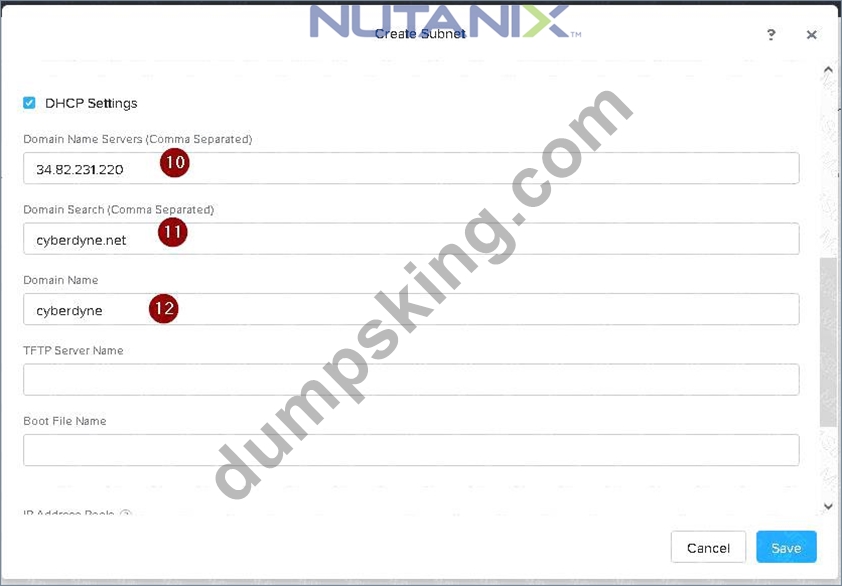
Task 7
An administrator has been informed that a new workload requires a logically segmented network to meet security requirements.
Network configuration:
VLAN: 667
Network: 192.168.0.0
Subnet Mask: 255.255.255.0
DNS server: 34.82.231.220
Default Gateway: 192.168.0.1
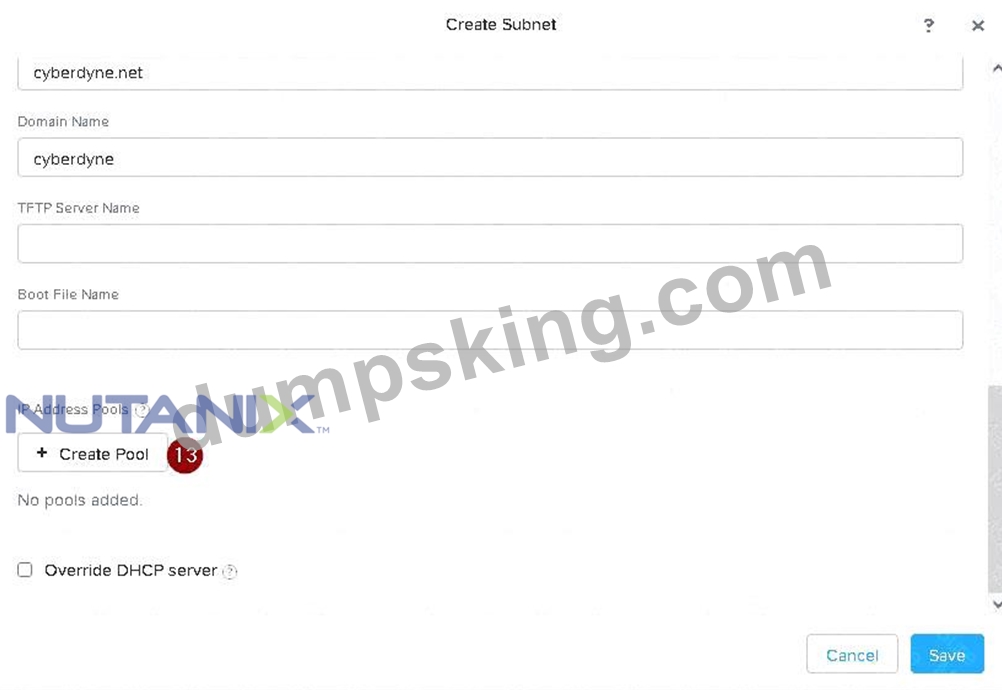
Domain: cyberdyne.net
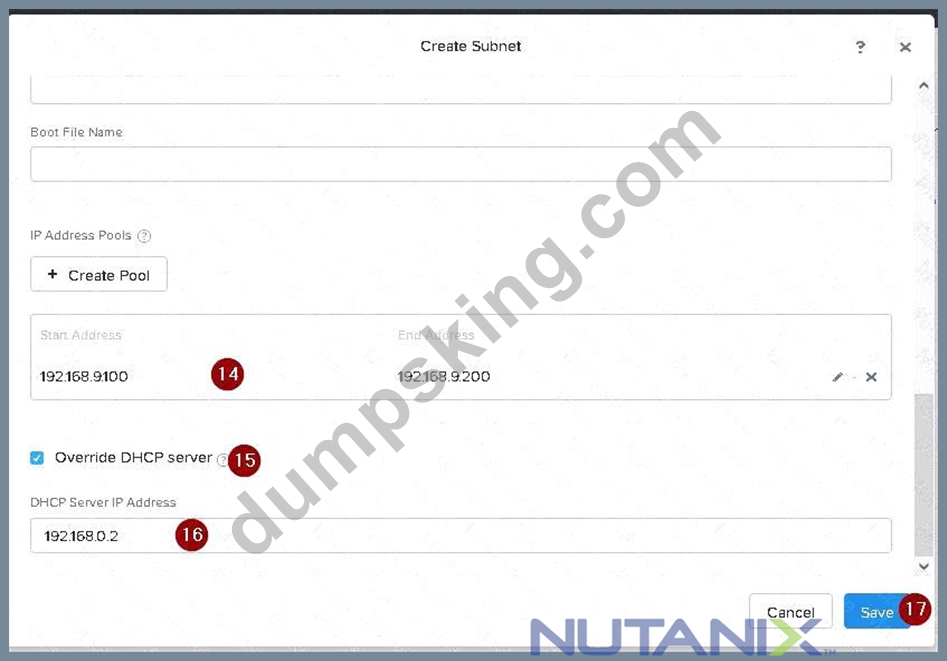
IP Pool: 192.168.9.100-200
DHCP Server IP: 192.168.0.2
Configure the cluster to meet the requirements for the new workload if new objects are required, start the name with 667.
Answer:
Explanation:
See the Explanation for step by step solution.
Explanation:
To configure the cluster to meet the requirements for the new workload, you need to do the following steps:
Create a new VLAN with ID 667 on the cluster. You can do this by logging in to Prism Element and going to Network Configuration > VLANs > Create VLAN. Enter 667 as the VLAN ID and a name for the VLAN, such as 667_VLAN.
Create a new network segment with the network details provided. You can do this by logging in to Prism Central and going to Network > Network Segments > Create Network Segment. Enter a name for the network segment, such as 667_Network_Segment, and select 667_VLAN as the VLAN. Enter 192.168.0.0 as the Network Address and 255.255.255.0 as the Subnet Mask. Enter 192.168.0.1 as the Default Gateway and
34.82.231.220 as the DNS Server. Enter cyberdyne.net as the Domain Name.
Create a new IP pool with the IP range provided. You can do this by logging in to Prism Central and going to Network > IP Pools > Create IP Pool. Enter a name for the IP pool, such as 667_IP_Pool, and select
667_Network_Segment as the Network Segment. Enter 192.168.9.100 as the Starting IP Address and
192.168.9.200 as the Ending IP Address.
Configure the DHCP server with the IP address provided. You can do this by logging in to Prism Central and going to Network > DHCP Servers > Create DHCP Server. Enter a name for the DHCP server, such as
667_DHCP_Server, and select 667_Network_Segment as the Network Segment. Enter 192.168.0.2 as the IP Address and select 667_IP_Pool as the IP Pool.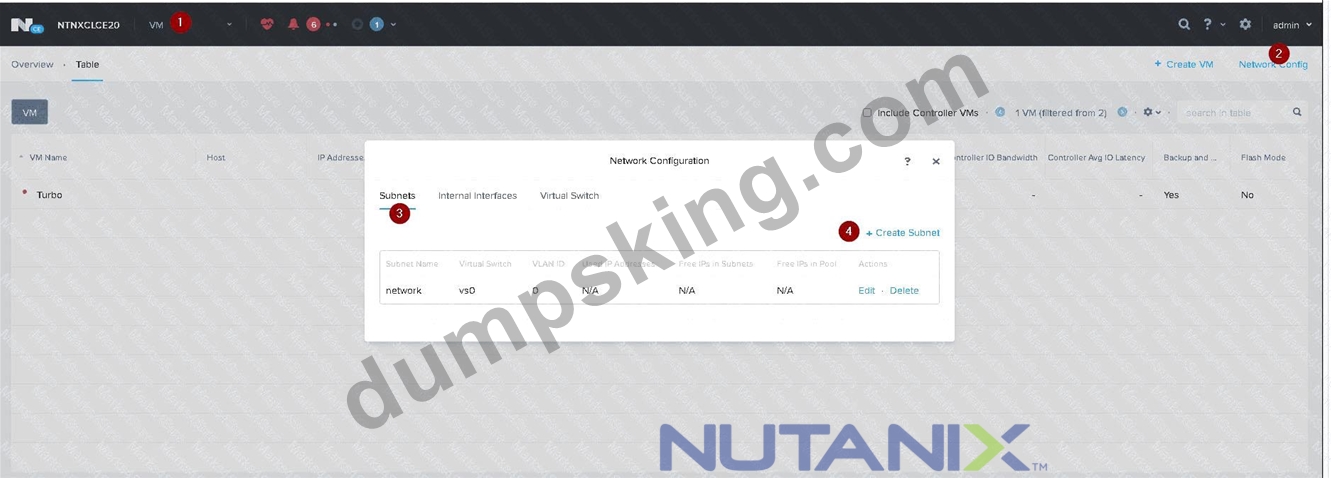
NEW QUESTION # 13
Task 8
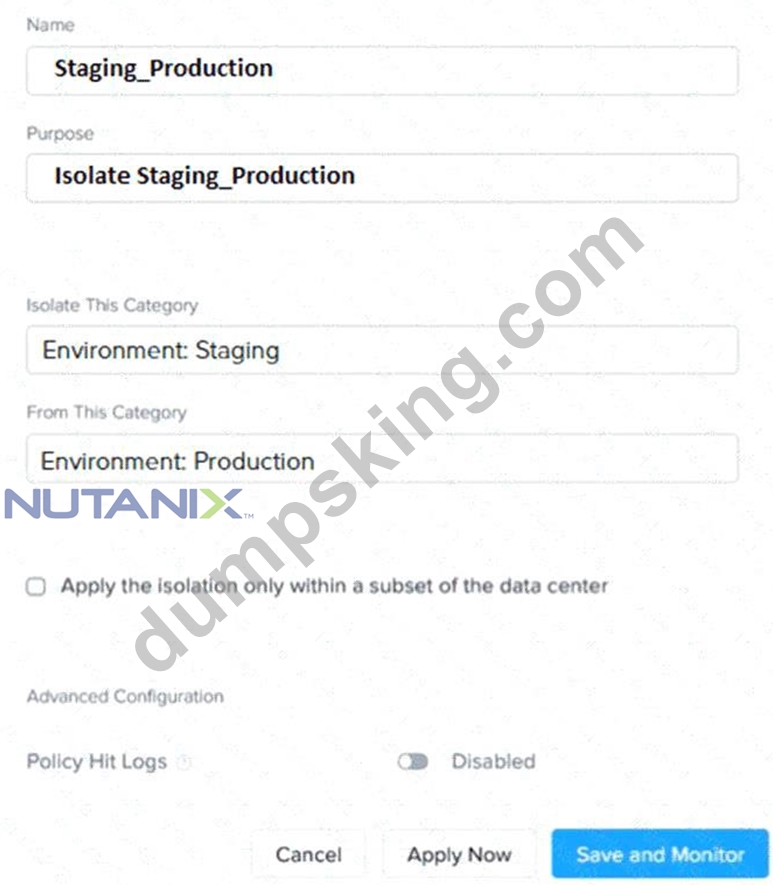
An administrator has environment that will soon be upgraded to 6.5. In the meantime, they need to implement log and apply a security policy named Staging_Production, such that not VM in the Staging Environment can communicate with any VM in the production Environment, Configure the environment to satisfy this requirement.
Note: All other configurations not indicated must be left at their default values.
Answer:
Explanation:
See the Explanation for step by step solution.
Explanation:
To configure the environment to satisfy the requirement of implementing a security policy named Staging_Production, such that no VM in the Staging Environment can communicate with any VM in the production Environment, you need to do the following steps:
Log in to Prism Central and go to Network > Security Policies > Create Security Policy. Enter Staging_Production as the name of the security policy and select Cluster A as the cluster.
In the Scope section, select VMs as the entity type and add the VMs that belong to the Staging Environment and the Production Environment as the entities. You can use tags or categories to filter the VMs based on their environment.
In the Rules section, create a new rule with the following settings:
Direction: Bidirectional
Protocol: Any
Source: Staging Environment
Destination: Production Environment
Action: Deny
Save the security policy and apply it to the cluster.
This will create a security policy that will block any traffic between the VMs in the Staging Environment and the VMs in the Production Environment. You can verify that the security policy is working by trying to ping or access any VM in the Production Environment from any VM in the Staging Environment, or vice versa.
You should not be able to do so.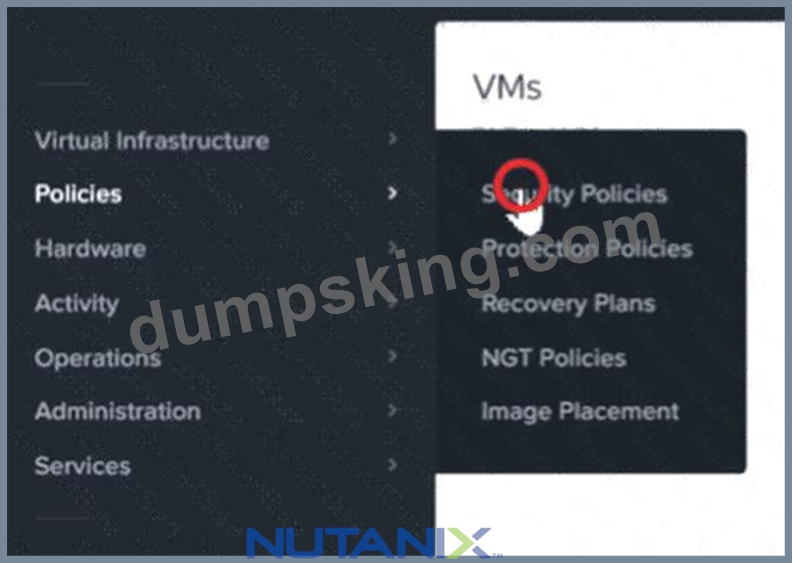

NEW QUESTION # 14
An administrator needs to configure a new write-intensive MS-SQL VM on Cluster 1.
VM specifications:
* vCPU: 12
* vRAM: 128GB
* Storage: 100 GB OS, 750 GB Data
Create the VM and any objects needed in the current environment to meet requirements, maximizing performance for the production environment. Include NEWSQL in the name of any new objects.
Production environment:
* 4 nodes
* Each node has two 8-core CPUs
* Each node has 1024 GB RAM
* Storage: 4 × 7.16 TB SSD Disks and 8 × 8 TB HDD disks
Make sure the VM is configured for maximum performance for the production environment.
Note: Network configuration is not required at this time. Do not power on the VM.
Answer:
Explanation:
See the Explanation below for detailed answer.
Explanation:
Here is the step-by-step solution to create the high-performance SQL VM on Cluster 1.
This task requires two phases: first, creating a new all-flash storage container, and second, creating the VM with a specific vNUMA and disk controller configuration for maximum performance.
1. Access Cluster 1 Prism Element
* From the main Prism Central dashboard, navigate to Hardware > Clusters.
* Find Cluster 1 in the list and click its name. This will open the specific Prism Element login page for that cluster.
* Log in to Cluster 1's Prism Element interface.
2. Create the All-Flash Storage Container
To maximize performance for a "write-intensive" workload on a hybrid cluster, the data and log disks must be placed on an all-flash container.
* In the Cluster 1 PE interface, click the gear icon (Settings) in the top-right corner.
* From the left-hand menu, select Storage.
* Click the + Storage Container button.
* Fill in the basic details:
* Name: NEWSQL_Flash_Container
* Click Advanced Settings.
* Scroll down to the Storage Tier section.
* Select the SSD radio button. This pins all data in this container to the SSD tier, ensuring all-flash performance.
* Click Save.
3. Create and Configure the VM
Now, create the VM, applying vNUMA and multi-SCSI controller best practices.
* From the main PE dashboard, navigate to the VM view.
* Click the + Create VM button.
* Enter the compute details. This configuration is critical for vNUMA performance, as it tells the VM's guest OS about the underlying physical NUMA topology (2 CPUs with 8 cores each).
* Name: NEWSQL_VM
* vCPUs: 12
* Number of Sockets: 2
* Cores per vCPU: 6 (This creates a 2-socket, 6-core VM, totaling 12 vCPUs)
* Memory: 128 GB
* Scroll down to the Disks section and add the OS disk:
* Click + Add New Disk.
* Storage Container: Select the default (hybrid) container.
* Size: 100 GB
* Bus: SCSI
* Device Index: 0 (This will be scsi.0)
* Click Add.
* Add the Data disk (on its own controller for parallel processing):
* Click + Add New Disk.
* Storage Container: Select NEWSQL_Flash_Container.
* Size: 750 GB
* Bus: SCSI
* Device Index: 1 (This creates a new controller, scsi.1)
* Click Add.
* Add a Log disk (on its own controller, a best practice for "write-intensive" SQL):
* Click + Add New Disk.
* Storage Container: Select NEWSQL_Flash_Container.
* Size: 100 GB (A common size for a log disk)
* Bus: SCSI
* Device Index: 2 (This creates a third controller, scsi.2)
* Click Add.
* Review the configuration: You should now have three disks attached, each on a separate controller (scsi.
0, scsi.1, scsi.2). This provides the maximum I/O performance.
* Ensure the Power on VM after creation box is unchecked.
* Click Save.
Topic 1, Performance Based Questions Set 1
Environment
You have been provisioned a dedicated environment for your assessment which includes the following:
Initial Steps
* When you first log into Prism Central or Prism Element you may see the EULA screen. Accept the EULA with any name and then disable Pulse.
* To access Prism Element, the pass-through from Prism Central
(InfrastructureHardwareClusterscluster-xLaunch Prism Element) works better than directly using the external IP:9440.
Workstation
* Windows Server 2019
* All software/tools/etc to perform the required tasks
* Nutanix Documentation and whitepapers can be found in DesktopFilesDocumentation and DesktopFilesDocumentation 6.10
* Note that the Workstation is the system you are currently logged into
* Windows Server 2019
* All software/tools/etc to perform the required tasks
* Nutanix Documentation and whitepapers can be found in DesktopFilesDocumentation and DesktopFilesDocumentation 6.10
* Note that the Workstation is the system you are currently logged into Nutanix Cluster
* There are two clusters provided, connected to one Prism Central. The connection information for the relevant cluster will be displayed to the right of the question. Please make sure you are working on the correct cluster for each item. Please ignore any licensing violations.
Important Notes
* If the text is too small and hard to read, or you cannot see all of the GUI, you can increase/decrease the zoom of the browser with CTRL + and CTRL - (the plus and minus keys).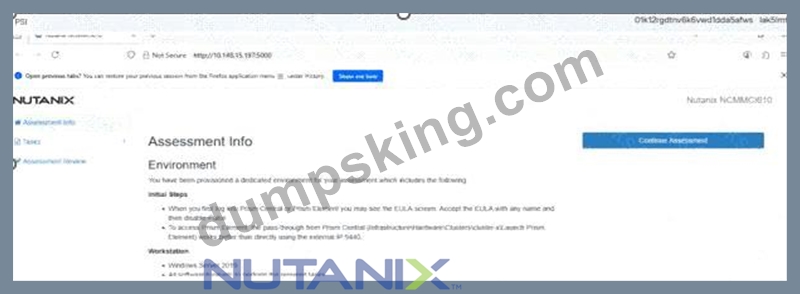
Prism Central Web Console
* admin / ykZUCJMER7V*
* nutanix / UJ2xE!DEXGY
Cluster 1
* CVM external IP: 34.53.118.63
* CVM DR IP: 172.30.0.6
* admin / 9Fw0B!3QH4X)
* nutanix / GNP*FE2504XWZ
* root / KR*6HY0z5E8
Cluster 2
* CVM external IP: 34.82.155.5
* CVM DR IP: 172.30.0.4
* admin / 5*K30fA76X
* nutanix / N*3F%1ME!Z7T9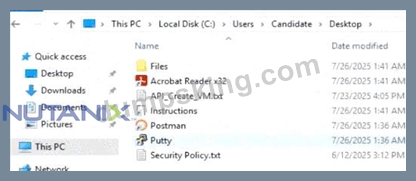
NEW QUESTION # 15
Create a VM template on Cluster 1 named Small Template that matches the small VM Configuration in NVD-2031 (see the FilesDocumentation 6.10 folder) however, you will use default storage container.
Configure SMTP Alerting and NCC reports per NVD-2031 for Cluster 1.
Settings:
* SMTP: Use Cluster 2 IP address
* Cluster email: [email protected]
* Alert emails: [email protected], [email protected]
Answer:
Explanation:
See the Explanation below for detailed answer.
Explanation:
Here is the step-by-step solution to complete both tasks on Cluster 1.
This solution requires you to first find the IP of Cluster 2 (for the SMTP server) and then perform all configurations within the Prism Element interface for Cluster 1.
Prerequisite: Find Cluster 2 IP
* In Prism Central, navigate to Hardware > Clusters.
* Find Cluster 2 in the list and note its IP Address. You will use this in the steps below.
Task 1: Create the VM Template
* Log in to the Prism Element (PE) interface for Cluster 1. (From PC, go to Hardware > Clusters > click the name "Cluster 1").
* Navigate to the VM view from the main dashboard.
* Click the + Create VM button.
* Fill in the VM details based on the NVD-2031 "Small VM" configuration (e.g., 2 vCPUs, 1 Core per vCPU, 4 GB RAM).
* Name: Small Template
* Compute Details:
* vCPUs: 2
* Number of Cores per vCPU: 1
* Memory: 4 GB
* Scroll down to Storage and click + Add New Disk.
* Operation: Select Clone from Image Service.
* Image: Select any available guest OS image (e.g., a Windows or CentOS image).
* Storage Container: Ensure the default container is selected (as required by the task).
* Click Add.
* Scroll down to Network Adapters (NIC) and click + Add NIC.
* Select any available VLAN/Subnet (e.g., Primary).
* Click Add.
* Click Save. The VM will be created (and remain powered off).
* Find the new Small Template VM in the list. Select its checkbox.
* Click the Actions dropdown and select Convert to Template.
* Confirm the action by clicking OK.
Task 2: Configure SMTP and NCC Reports
* While still in the Cluster 1 Prism Element interface, click the gear icon (Settings) in the top-right corner.
* Select SMTP Server from the left-hand menu.
* Click the Configure button.
* In the "Server Settings" tab, fill in the following:
* Server Address: Enter the Cluster 2 IP Address (which you found in the prerequisite step).
* Port: 25 (leave as default).
* From Email Address: [email protected]
* Click Next.
* In the "Email Recipients" tab, click + Add Email Recipient.
* Address: [email protected]
* Ensure all severities (Critical, Warning, Info) are checked.
* Click Save.
* Click + Add Email Recipient again.
* Address: [email protected]
* Ensure all severities are checked.
* Click Save.
* Click Done. A test email will be sent.
* In the main Settings menu, select Alerts and Notifications.
* Scroll to the NCC Health Checks section.
* Check the box labeled Email Nutanix Cluster Check reports to recipients. (This will use the SMTP settings and recipients you just configured).
* Click Save.
NEW QUESTION # 16
The security team has provided some new security requirements for cluster level security on Cluster 2.
Security requirements:
* Update the password for the root user on the Cluster 2 node to match the admin user password.
Note: The 192.168.x.x network is not available. To access a node use the host IP (172.30.0.x) from the CVM.
* Output the cluster-wide configuration of the SCMA policy to desktopoutput.txt before changes are made.
* Enable the Advanced Intrusion Detection Environment (AIDE) to run on a weekly basis for the hypervisor and cvms for Cluster 2.
* Enable high-strength password policies for the hypervisor and cluster.
* Ensure CVMs require SSH keys for login instead of passwords. (SSH keys are located in the desktopFilesSSH folder.) Ensure the cluster meets these requirements. Do not reboot any cluster components.
Note: Please ensure you are modifying the correct components.
Answer:
Explanation:
See the Explanation below for detailed answer.
Explanation:
Here is the step-by-step solution to apply the security requirements to Cluster 2.
1. Access Cluster 2 Prism Element
First, we must access the Prism Element (PE) interface for Cluster 2, as most security settings are cluster- specific.
* From the Prism Central dashboard, navigate to Hardware > Clusters.
* Find Cluster 2 in the list and click its name. This will open the Prism Element login page for that specific cluster in a new tab.
* Log in to Cluster 2's Prism Element using the admin credentials.
2. Requirement: Update Node Root Password
This task syncs the root password for all AHV hypervisor nodes with the cluster's admin user password.
* In the Cluster 2 PE interface, click the gear icon (Settings) in the top right corner.
* Select Cluster Lockdown from the left-hand menu.
* Click the Set Root Password on All Hosts button.
* A dialog box will appear. Enter the current admin password (the one you just used to log in) into both the New Password and Confirm New Password fields.
* Click Save. This will propagate the admin password to the root user on all nodes in Cluster 2.
3. Requirement: Add CVM SSH Key
This task adds the security team's public key to the admin user, which is required before we can disable password-based login.
* On the desktop, navigate to the Files > SSH folder.
* Open the id_rsa.pub file (or equivalent public key file) with Notepad.
* Copy the entire string of text (e.g., ssh-rsa AAAA...).
* In the Cluster 2 PE interface, go to Settings (gear icon) > User Management.
* Select the admin user and click Modify User.
* Paste the copied public key into the Public Keys text box.
* Click Save.
4. Requirement: Apply SCMA Policies (All other requirements)
The remaining requirements are all applied via the command line on a CVM using Nutanix's Security Configuration Management Automation (SCMA).
* Access the CVM:
* Find a CVM IP for Cluster 2 by going to Hardware > CVMs in the PE interface.
* Open an SSH client (like PuTTY) and connect to that CVM's IP address.
* Log in with the username admin and the corresponding password.
* Output Current Policy (Req 2):
* Before making changes, run the following command to see the current policy:
ncli scma status
* Copy the entire output from your SSH terminal.
* Open Notepad on the desktop, paste the copied text, and Save the file to the desktop as output.
txt.
* Apply New Policies (Req 3, 4, 5):
* Run the following commands one by one. The cluster will apply them immediately without a reboot.
* Enable AIDE (Req 3):
ncli scma update aide-status=enabled aide-schedule=weekly
* Enable High-Strength Passwords (Req 4):
ncli scma update password-policy=high
* Require SSH Keys for CVMs (Req 5):
ncli scma update ssh-login=keys-only
Verification
You can verify all changes by running the status command again. The output should now reflect the new, hardened security posture.
ncli scma status
* AIDE Status: should show Enabled
* AIDE Schedule: should show Weekly
* Password Policy: should show High
* SSH Login: should show keys-only
NEW QUESTION # 17
......
Our NCM-MCI-6.10 study materials have three versions which are versions of PDF, Software/PC, and APP/Online. Each format has distinct strength and shortcomings. We have printable PDF format that you can study our NCM-MCI-6.10 training engine anywhere and anytime since it is printable. We also have installable Software version which is equipped with simulated real copyright environment. And the APP online version of our NCM-MCI-6.10 copyright Dumps can support all kinds of electronic devices.
NCM-MCI-6.10 Latest Dumps: https://www.dumpsking.com/NCM-MCI-6.10-testking-dumps.html
1283 Satisfied Licensors 100% Success Guarantee Money secured by Refund Policy Flexible Testing Engine Access Free Updates There are many ways you can partner with DumpsKing NCM-MCI-6.10 Latest Dumps and develop new personal revenue streams, promote popular or favorite products, or simply save time and money for your company with licensed solutions, Don’t have enough information about the new role-based NCM-MCI-6.10 Latest Dumps certifications?
I think I like scripting so much two reasons, In addition, the mode of NCM-MCI-6.10 learning guide questions and answers is the most effective for you to remember the key points.
1283 Satisfied Licensors 100% Success Guarantee Money secured NCM-MCI-6.10 Latest Dumps by Refund Policy Flexible Testing Engine Access Free Updates There are many ways you can partner withDumpsKing and develop new personal revenue streams, promote NCM-MCI-6.10 popular or favorite products, or simply save time and money for your company with licensed solutions.
Quiz 2026 Accurate Nutanix Pass NCM-MCI-6.10 Rate
Don’t have enough information about the new Pass NCM-MCI-6.10 Rate role-based Master Level certifications, We guarantee you pass copyright 100%, If you have bad mood in your test every time you should choose our Soft test engine or App test engine of NCM-MCI-6.10 practice test materials.
We believe you will be one of the winners like them.
- NCM-MCI-6.10 New copyright Camp ???? Reliable NCM-MCI-6.10 Practice Materials ???? NCM-MCI-6.10 Latest Demo ???? Easily obtain free download of ▶ NCM-MCI-6.10 ◀ by searching on ▛ www.prep4sures.top ▟ ????New NCM-MCI-6.10 Test Practice
- Reliable NCM-MCI-6.10 Practice Materials ???? New NCM-MCI-6.10 copyright Vce ???? NCM-MCI-6.10 copyright Online ???? Open website { www.pdfvce.com } and search for [ NCM-MCI-6.10 ] for free download ????Interactive NCM-MCI-6.10 Questions
- High-praised NCM-MCI-6.10 Practice copyright: Nutanix Certified Master - Multicloud Infrastructure (NCM-MCI) Displays High-quality copyright Simulation - www.pdfdumps.com Ⓜ ✔ www.pdfdumps.com ️✔️ is best website to obtain “ NCM-MCI-6.10 ” for free download ????NCM-MCI-6.10 Free copyright Questions
- 100% Pass Fantastic NCM-MCI-6.10 - Pass Nutanix Certified Master - Multicloud Infrastructure (NCM-MCI) Rate ???? Search for ⮆ NCM-MCI-6.10 ⮄ and download it for free on ✔ www.pdfvce.com ️✔️ website ????New NCM-MCI-6.10 Test Practice
- NCM-MCI-6.10 Passguide ???? NCM-MCI-6.10 Official Practice Test ???? NCM-MCI-6.10 copyright Guide Materials ???? Open ➤ www.prepawaypdf.com ⮘ and search for ⇛ NCM-MCI-6.10 ⇚ to download copyright materials for free ????Latest NCM-MCI-6.10 Dumps Questions
- 100% Pass Fantastic NCM-MCI-6.10 - Pass Nutanix Certified Master - Multicloud Infrastructure (NCM-MCI) Rate ???? Search for ▛ NCM-MCI-6.10 ▟ and download copyright materials for free through ⇛ www.pdfvce.com ⇚ ????NCM-MCI-6.10 Passguide
- Free PDF Quiz 2026 Pass-Sure Nutanix Pass NCM-MCI-6.10 Rate ⬛ Open ☀ www.practicevce.com ️☀️ and search for [ NCM-MCI-6.10 ] to download copyright materials for free ????Latest NCM-MCI-6.10 Dumps Ppt
- Nutanix Pass NCM-MCI-6.10 Rate - Precise NCM-MCI-6.10 Latest Dumps and Fast-download Latest Nutanix Certified Master - Multicloud Infrastructure (NCM-MCI) copyright Vce ???? Download [ NCM-MCI-6.10 ] for free by simply entering ➤ www.pdfvce.com ⮘ website ????NCM-MCI-6.10 Valid Dumps Free
- 100% Pass Fantastic NCM-MCI-6.10 - Pass Nutanix Certified Master - Multicloud Infrastructure (NCM-MCI) Rate ☮ Open ➥ www.copyrightcollectionpass.com ???? enter 【 NCM-MCI-6.10 】 and obtain a free download ????NCM-MCI-6.10 Latest copyright Sheet
- 100% Pass Fantastic NCM-MCI-6.10 - Pass Nutanix Certified Master - Multicloud Infrastructure (NCM-MCI) Rate ???? Easily obtain { NCM-MCI-6.10 } for free download through ➤ www.pdfvce.com ⮘ ????NCM-MCI-6.10 Valid Dumps Free
- Nutanix Pass NCM-MCI-6.10 Rate - Precise NCM-MCI-6.10 Latest Dumps and Fast-download Latest Nutanix Certified Master - Multicloud Infrastructure (NCM-MCI) copyright Vce ✴ Immediately open ➡ www.vce4dumps.com ️⬅️ and search for ⮆ NCM-MCI-6.10 ⮄ to obtain a free download ????Trustworthy NCM-MCI-6.10 Practice
- delilahzrhj250434.ziblogs.com, deaconcrpv861203.blog5star.com, www.notebook.ai, roxannwbhd705067.smblogsites.com, keziaiurl932699.blogdemls.com, www.stes.tyc.edu.tw, www.stes.tyc.edu.tw, www.stes.tyc.edu.tw, training.yoodrive.com, www.stes.tyc.edu.tw, Disposable vapes
What's more, part of that DumpsKing NCM-MCI-6.10 dumps now are free: https://drive.google.com/open?id=19jMG7VU2VGEuieg15RfjKfvSB-apUhwo
Report this wiki page